Compiling your First x64 Windows Assembly Program
For my first post in 2025, I wanted to write about how to get started with developing x64 Assembly programs for Windows. When I was scavenging for resources on the internet, there were many guides on how to write and read assembly but very few guides on how to structure and compile x64 assembly for windows. Other than sonictk’s in-depth post on Understanding Windows x64 Assembly which I recommend everyone to have a read through. I won’t be covering the basics of x64 assembly language syntax, but there’s plenty of resources which I can share in the references section.
Requirements
- The Netwide Assembler (NASM) NASM, I used version 2.16.03.
- Visual Studio 2022 with the Desktop Development with C++ workload installed.
- Any text editor for writing Assembly.
Your First Program
The NASM documentation provides instructions on how to layout and compile assembly.
Create the following file and save it as first_program.asm.
section .text
global main

main:
    mov rax, 1337
    ret
The section .text directive tells the NASM assembler the start of the program code where we can write our assembly.
We then define global main to export the main symbol so that it’s visible when it comes to linking.
Finally, the program moves the value 1337 into the rax register also known as the return value register. The program should return the value 1337 when executed.
Compiling and Running
We can now compile our assembly file as an executable file. After installing the NASM tool, add the binary file is within the path environment variable. If configured correctly, you should be able to run the NASM command line from any directory in the Windows terminal.
nasm -v
NASM version 2.16.03 compiled on Apr 17 2024
Run the following command to assemble the file into a windows 64-bit object.
nasm -f win64 first_program.asm
After assembling, you should have an object file in the same directory.
> dir
[..]
05/01/2025  11:34    <DIR>          .
03/01/2025  12:55    <DIR>          ..
04/01/2025  22:45                72 first_program.asm
05/01/2025  11:34               178 first_program.obj
To link the object file to create an executable file, first open up the Developer Command Prompt for Visual studio.

Then navigate to the directory containing the object file and run the following link command to create the executable.
link first_program.obj /entry:main /out:first_program.exe
The /entry option specifies the entry point function in this case, its main and /out specifies the name of the executable.
We can now run our program.
C:\Users\Alex\Documents\Assembly>.\first_program.exe
The program does not print anything to the console so to get the return value, we can print the value of ERRORLEVEL after executing the program.
C:\Users\Alex\Documents\Assembly>echo %ERRORLEVEL%
1337
The return value is 1337 which confirms that our assembly file is working as expected.
Hello World Message Box
I must admit, the executable we just made is pretty boring as it just returns a value. Let’s create something more visually interesting such as a program that shows a message box when executed.
To display a message box, we can leverage the MessageBoxA function within the Win32 API.
int MessageBoxA(
  [in, optional] HWND   hWnd,
  [in, optional] LPCSTR lpText,
  [in, optional] LPCSTR lpCaption,
  [in]           UINT   uType
);
The documentation also specifies what each parameter is used for.

- The first parameter,
Hwndcan be set to null as we are not expecting any owner. - The second parameter,
lpTextis a pointer to string containing the body text of the message box - The third parameter
lpCaptionis a pointer to a string containing the message box title - The fourth parameter
utypeis an integer value by carrying out xor operations for the group of flags.
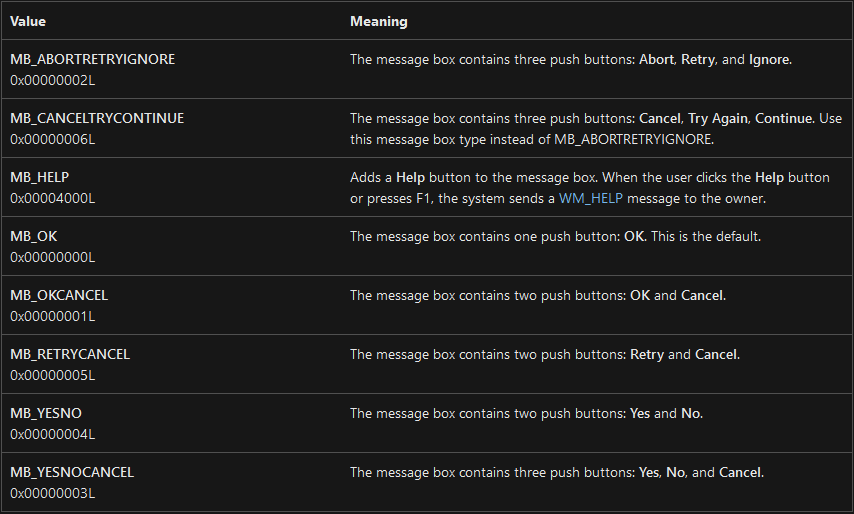
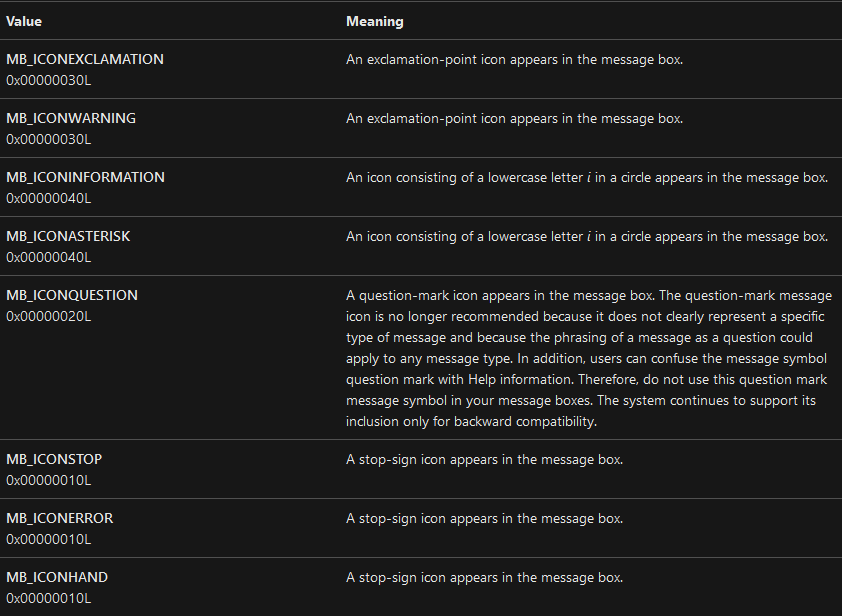
These are the following group flags that we will use to calculate the value.


To create a Message Box with a yes and no button (MB_YESNO) and has the icon information (MB_ICONINFORMATION), we xor the corresponding values 0x04 with 0x40 to get 0x44 which is 68 as an integer. I recommend trying out different values to see the various types of message boxes that can be created.
X64 Calling Conventions
By reading the Microsoft x64 ABI conventions, we can remind ourselves which registers are used for which parameter order when calling a function.
rcxfor the first parameterrdxfor the second parameterr8for the third parameterr9for the fourth parameter
We also need to store strings within our assembly code to get the program to display our message. To do this, we can leverage the data section to declare initialised data. Here are a few examples in the NASM documentation.
db 0x55 ; just the byte 0x55
db 0x55,0x56,0x57 ; three bytes in succession
db ’a’,0x55 ; character constants are OK
db ’hello’,13,10,’$’ ; so are string constants
dw 0x1234 ; 0x34 0x12
dw ’a’ ; 0x61 0x00 (it’s just a number)
dw ’ab’ ; 0x61 0x62 (character constant)
dw ’abc’ ; 0x61 0x62 0x63 0x00 (string)
dd 0x12345678 ; 0x78 0x56 0x34 0x12
dd 1.234567e20 ; floating-point constant
dq 0x123456789abcdef0 ; eight byte constant
dq 1.234567e20 ; double-precision float
dt 1.234567e20 ; extended-precision float
We can store strings using the db and then append a null byte to signal the end of the string.
section .data
    msg db "Hello 2025!", 0
    title db "Cool Message", 0
We can then reference its location using the lea instruction. As lpText and lpCaption are the second and third parameters, we can store the location of the strings in the rdx and r8 registers.
lea rdx, [msg]
lea r8, [title]
The remaining registers used to store the first and fourth parameters, rcx and r9, for the MessageBoxA function only need to hold immediate values. As previously mentioned, the first parameter is 0 and the fourth parameter is 68.
We can use the mov command to assign values to the registers.
mov rcx, 0
mov, r9, 68
Or even better, use the xor command to set the rcx register as when you xor the same value, the result is always 0
xor rcx, rcx
Finally, we need to import the MessageBoxA function which we can do using the extern keyword.
extern MessageBoxA
It’s Almost Coming Together
Assembling all the pieces together, we are left with the following assembly code.
section .data
    msg db "Hello 2025!", 0
    caption db "Cool Message", 0

section .text
global main
extern MessageBoxA

main:
    xor rcx, rcx
    lea rdx, [msg]
    lea r8, [caption]
    mov r9, 68
    call MessageBoxA
    ret
Wait a minute there’s one more thing we almost forgot! It’s allocating the shadow store detailed in the x64 calling convention. This convention specifies that we need to allocate space in the stack before we call a function so that the callee (the function we’re about to call) has the option save the 4 function argument registers onto the stack. To add space, we can simply decrement the stack pointer rsp since stack memory grows downwards towards lower memory addresses.
Additionally, the stack needs to be 16-byte aligned before we call a function. We must ensure the value of the stack pointer, the rsp register is a multiple of 16. Hexidecimal is base-16 so the value must end with a 0.
Also, after allocating the shadow space, we need to make sure to deallocate the space after the function call. This can be done by incrementing the stack pointer the same amount as we decremented.
Let’s try the following code first where we subtract rsp by 0x20 to make space for the four 8-byte registers.
main:
    sub rsp, 0x20
    xor rcx, rcx
    lea rdx, [msg]
    lea r8, [title]
    mov r9, 68
    call MessageBoxA
    add rsp, 0x20
    ret
If we compile the program and execute, the program will crash since the stack is not aligned correctly before the function call as the rsp register does not end in a 0.

If we subtract by 0x28 instead, the stack should be aligned
main:
    sub rsp, 0x28
    xor rcx, rcx
    lea rdx, [msg]
    lea r8, [title]
    mov r9, 68
    call MessageBoxA
    add rsp, 0x28
    ret
The stack is aligned correctly before the function call since the rsp register ends in a 0, and so our program will run successfully.

After assembling all the pieces together, we are left with the final program helloworld.asm. I know there’s one my thing I have not talked about which is default rel. This tells the NASM assembler to compile with rip-relative addressing resulting in a smaller executable file size. I’m not a PE file format expert to fully explain why this is the case but maybe, I’ll uncover this mystery in my next blog post.
default rel

section .data
    msg dw "Hello 2025!"
    title dw "Cool Message"

section .text
global main
extern MessageBoxA

main:
    sub rsp, 0x28
    xor rcx, rcx
    lea rdx, [msg]
    lea r8, [title]
    mov r9, 68
    call MessageBoxA
    add rsp, 0x28
    ret
Then compile and link the assembly file. We have to also include the user32.lib library when linking so that we can import the MessageBoxA function which resides in the library.
nasm -f win64 helloWorld.asm
link helloWorld.obj /subsystem:console /entry:main /out:HelloWorld.exe user32.lib
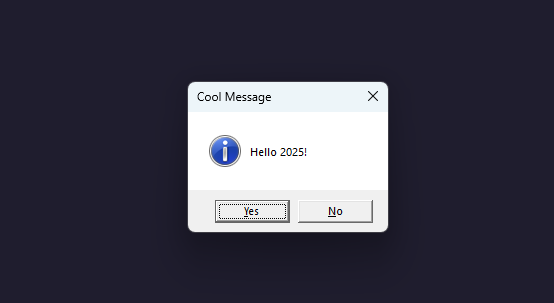
If we then run our file, we should got our very own message box.

Hopefully I’ve covered enough in this post to get started with assembly development. Experiment with different Win32 APIs to make much more interesting programs in Assembly. I definitely struggled for resources in assembly development; there’s an abundant of resources out there on how read assembly for reverse engineering and malware analysis but a scarce amount in how to setup a developer environment for building programs in assembly.
References